 Once I get a fair amount of detail in and I’m satisfied with the sketch. I’ll then start adding color. At this point it’s like a page from a coloring book, you add the color and the picture comes to life. You just have to stay in the lines.
Sunday, February 24, 2008
Frog Hollow Garage Oil Painting
 Once I get a fair amount of detail in and I’m satisfied with the sketch. I’ll then start adding color. At this point it’s like a page from a coloring book, you add the color and the picture comes to life. You just have to stay in the lines.
Tightening up the drawing
Painting the light
Califon New Jersey Oil Painting
 Alright I’m starting another painting, this one is from a picture I took while fly fishing in Califon New Jersey. Frog Hollow Garage, I couldn't resist stoping to take a picture of this interesting little garage on a side street. If I didn’t get lost I would have never found it. This is why I always keep my digital camera with me, because you never know when a wrong turn will lead you into a cool oil painting.
I decided to take a different approach on this painting by doing a light sketch with Paynes Gray and then filling in the dark areas. I squint my eyes till everythings a big blur of dark and light tones, then I just paint what I see. It looks kind of primitive at first but as I go on I’ll start removing paint with solvent dipped brushes to reveal details and highlights.
Blending down the under painting
Shore house oil painting in progress
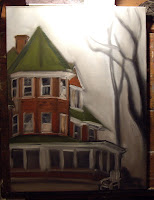 I went right at this one with Payne's gray, Titanium white, Venetian red and a mix of Cobalt blue & Cadmium yellow medium for the green roof.
I started out painting very loose,but I will be tightening things up down the road. I may also bled the whole painting with a large brush to give the allusion of atmosphere.
Island Heights Oil Painting
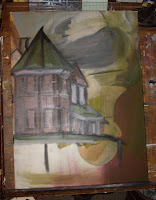1.jpg) So I decided to let the blue house oil painting dry for a few days. I feel like I’m on a roll now, so I’m going to keep on painting till the gas runs out.
So I decided to let the blue house oil painting dry for a few days. I feel like I’m on a roll now, so I’m going to keep on painting till the gas runs out.I’m going to try another house painting, this one is a big beautiful old house on a very steep hill over looking the bay in Island Heights New Jersey. My grandfather and uncle use to take us crabbing there when we were kids and I always remember looking up at this big old house thinking it was so cool. I went back to our old crabbing spot one day and took a picture of the house. I tried painting it in water colors a few years ago and it came out horrible......So I’m going to give it another shot in oils.
I’m painting this on an 18" x 24' canvas of an old self portrait that did not go so well. If I don’t like how the house comes out I guess I’ll just paint right over that too. I wonder how many times you can keep doing this?
Saturday, February 23, 2008
Choosing a focal point
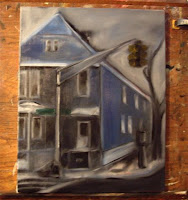 I'm going to try to stay loose on this painting. I may also consider letting the under painting dry at this stage so I can build up rich bright color at the focal point.
I have not decided yet where the focal point in the painting should be.... the stop light, street sign or the front door. Which ever I choose I will have to tone down the others some what.
Large brushes to start
Blue House Oil Painting
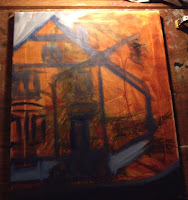 I started a new painting this morning. After looking through a couple hundred digital photos I’ve taken and keep in a file called "Consider painting these pictures Mike ".
The picture I decided to paint today is of a blue house on a corner in my old home town. One day while visiting I was stopped at a red light, a very long red light! I found myself staring at the blue house on the corner and day dreaming about my childhood. I walked past this house every day going to grade school and I guess I was amazed that the whole town has been consumed by progress while this blue house on the corner has remained unchanged for all these years. I wish I had a picture of the John’s Candy Store across the street because I think it would have made for a nice painting, but unfortunately it’s no longer there. A casualty of progress I guess.
I’m starting this painting on a 16"X 20" canvas of an old painting of mine that didn’t go so well. I probably have a hundred such canvases in the closet. I usually just take what ever paint I have left over from another project and just cover up the mess, let it dry and start something new on it.
Parakeet Oil Painting
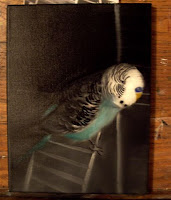 I let the parakeet dry for a few days before jumping back into it, I don’t think I’ve ever painted feathers before so I thought it would be best to put down a mid tone gray, let it dry then go back and bring out the darks and lights. I would like to keep this painting a little loose but I also want it to read well. There are a few things that I’m not happy with here so I may take a little time to think about what I’m doing before I continue. In the meantime I may start another painting tomorrow. I think it’s good to have several paintings going on at once, because if I stall out on one painting its nice to have another one waiting to be finished.
Monday, February 18, 2008
Parakeet Oil painting in progress
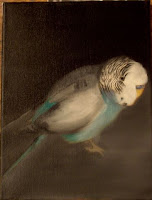 Wow....where did all the time go, it’s after 1:00am! I didn’t realize it was so late. I guess it’s easy to loose track of time when your painting. I’ve got to clean about fifteen brushes then I’m going to pass out!
Oh yea just one other thing, I’ve gotten some very encouraging comments from other artist these last few weeks. I would just like to say thank you for the support and that your kind words give me motivation and inspire me to work harder. Thank You.
Sunday, February 17, 2008
Retina Burn
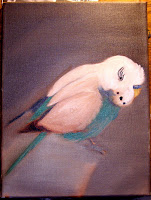 I like to keep the painting well blended at this stage. I’ve never noticed anyone else in art class doing this and it has always amazed me to see how some people can go right for the thick paint and bright colors.
There’s a term that I’ve read in a magazine called Retina Burn. This term was used in a story discussing the judging process in oil painting contests. I’ve always tried to remember this and apply it to my work when I can. It seems that competition judges look at thousands and thousands and thousands of oil painting slides during the judging process. It’s very easy for them to just keep clicking through the slide projector when the paintings become typical and boring. Retina Burn is the process of dulling the whole painting down while gradually bringing light and full color to the focal point of the painting. The strength of the color is so powerful that it immediately draws your attention to the focal point and keeps it there, burning an impression in your eyes.
Parakeet Oil Painting
Parakeet Oil Painting
New Oil Painting
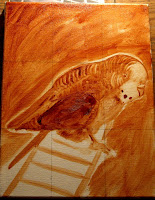 Ok so I think I’m going to put the clown painting away for now, I’ll come back to it in a few days with a fresh set of eyes. Hopefully whatever corrections that are needed will stick out like a sore thumb by then. In the meantime I’ve started a new painting. This one is of a parakeet. The idea came from a conversation I had with my mom last week. We were reminiscing about the good old days when she asked me if I remembered the parakeet I had when I was seven years old. I said of course I remember Dixon. Although I never understood why after about a year and for no apparent reason, she just gave it away to my great grandmother. She finely confessed and told me that rasing three boys was enough and that the bird was driving her crazy. I guess I can forgive her for that one, but when the thing died she told me it flew out the window while my great grandmother was cleaning the cage!!! Anyway.....this painting is for you mom!
When is a painting finished ?
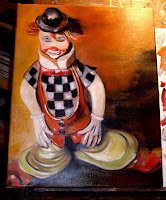 This is my third session on the clown painting. I let the under painting dry before I continued. This allows me to build up color while not disturbing the under painting. Some oil colors are so transparent that you’ll need several layers of the same color to get the full chroma of that color. Letting the under painting dry also allows me to let it show through in some spots adding depth and atmosphere.
So when I get to this point in a painting I like to walk away from it and take a good look from across the room. If I’m on the right track it should be readable from a good distance as well as up close. It’s a good idea to let the painting sit for a few days without looking at it. Just walk away and coming back with fresh eyes, its amazing how many simple errors you’ll find.. I guess while your painting your looking at your work for so long that you start to see what you want to see.
Another way to scrutinize your painting for flaws is to hold it up to a mirror. This will put a whole new spin on your work and you’ll notice compositional errors that for some reason you just couldn’t see before. For the life of me I don’t know why I torture myself with this particular process because my paintings always seem to look like a train wreck when I look at them in the mirror.
This all brings up a good point......when is a painting finished? When do you just stop painting before you fuss the whole thing to death? I say you just put the thing in a closet for a month or two without looking at it and if you still like it after that, then just sign it and call it quits. Sure you can show it to your friends and family, but if they don’t paint too then they may not be able to give you the technical critique your looking for, They may say they love it, not to hurt your feelings or they may say "well it’s ok but there’s something wrong with the nose!"
This is why art classes are so important for me, along with assistance on class projects my art teacher is kind enough to critique my personal works. Being the nice person that she is, at first I noticed she was being to kind. I guess positive encouragement is a good motivator but when you get right down to it, the only way to paint better is to know what your doing wrong. So I asked her "please don’t blow sunshine up my butt" just tell me the truth you won’t hurt my feelings. "What don’t you like about this painting, what’s wrong with it and what can I do to make it better.". I respect her as an artist and her honest critiques are worth there weight in gold. In the end I find it easier to call a painting finished when the art teacher says put the brushes down and step away from the painting ...your finished.
Sunday, February 10, 2008
Clown Oil Painting
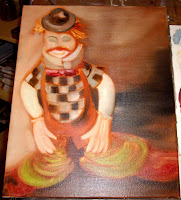 This is my second session on this painting. I am using a variety of hogs hair filberts and a 2 ½ inch blending brush. At this stage I still consider this to be an under painting. I’ve built up the color slowly by adding a small amount of titanium white to my colors for opacity while making sure not to use pure white at this stage. I’ll save the pure white for the final details, this will make the painting pop out later on. You may have noticed that I blend the painting at this stage. I feel that this gives the painting the depth I’m looking for. Later on as I add more color, detail , texture, highlights and hard & soft edges to bring the subject forward, the areas I have blended now should recede nicely into the back round.
What's on your easel ?
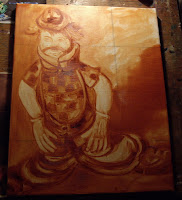 Today I have a clown on mine!
I found this little 3 inch clown figure that I thought would make an interesting painting. I want to paint it on a 14 x 18 canvas, and for me sizing this little guy up from 3x2 inches to 14 x 18 inches can be a real problem. So I’ve decided to take a digital picture of the little guy in the proper lighting with a cast shadow for a more dramatic affect. Then I cropped it on Photoshop and printed it out on grided paper. I then put a similar grid onto my 18x 14 canvas and proceeded to draw the clown with a thin wash of burnt sienna oil paint. (The brushes I used were a #12 hogs hair filbert, # 10 red sable bright and #8 & 18 red sable cats tongue). I find this approach to be a good method to correctly enlarge an object, I will still reflect back to the figure during the painting process for accuracy , dept and shadow. The whole procedure to get to this point took me about an hour.
Tuesday, February 5, 2008
What to do when your not in the mood to paint?
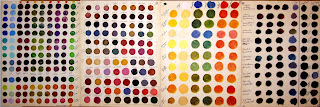 When I'm not in the mood to paint I like to make color charts. I find color charts to be a valuable tool for learning the charastics of your paints. If your anything like me you probably have to many paints to begin with, and mixing them to get just the right color while your trying to paint can become confusing and wasteful. So to save time and money I've made several color charts using 12"x16" canvas pad sheets.
Subscribe to:
Posts (Atom)


1.jpg)


