Monday, March 30, 2009

Anatomy for the Artist


To help improve my figure drawing skills it was clear I needed a good anatomy book. After checking out the reviews I decided to get Anatomy for the Artist by Sarah Simblet. This hard covered book measures 10" by 12" and has more then 250 photographs and 100 drawings, making it a great reference guide for improving your skills of rendering the human form. The book is sectioned for individual body parts and there are nice clear plastic transparent over layering pages that are very useful. $40 bucks at the Barns&Noble store at the mall....Amazon.com on line only $26 bucks !! with free shipping.

Sunday, March 29, 2009

Fly fishing and oil painting

There’s nothing more peaceful then a day of fly fishing....well except for oil painting of course. I do believe they are both good for the soul.

Thursday, March 19, 2009

Malcolm T. Liepek's inspirational words of wisdom

I came across an article in American Artist magazine on Malcolm T. Liepke . I have always admired his unique way of capturing people in there intimate moments. I can easily see why so many artist would want to copy his style. Malcolm T. Liepek is primarily a self taught artist with a wonderful state of mind, that I believe makes his work connect with so many people. Here are some of his inspirational words of wisdom.

" No matter how alone we feel in the world, how we imagine we are experiencing things in a vacuum. We all share the same human experience, we all have basic needs for connection, love and understanding. Try to reach those universal needs, it is whats primal in art."

"Everyone goes through life with their own problems, but we live in a pretty universal world, the more personal a piece the more people will connect."

Sunday, March 15, 2009

EmptyEasel.com


Just thought I’d share this great web page I found called EmptyEasel. Empty Easel is an online art magazine that offers practical advice, tips, and tutorials for creating and selling art. Lots of great stuff here , check it out !

Tuesday, December 16, 2008

Art Class


I took some time off of oil painting to help a family member with there home repairs, once again life gets in the way of art. Just thought I’d post this picture of me in art class working. The cool thing about this picture is the Arts Guild of Rahway used it on there web page.

Sunday, October 26, 2008

Snake oil painting

So with a few instructions from my art teacher on bringing the painting to a finish. I felt like I needed to take this painting somewhere else, somewhere personal. So after an in depth discussion on composition with my niece and nephew ages ten and twelve, we decided that this still life would benefit from a little creative licensing. I made the suggestion of adding the snakes looking for a mouse and they told me where they would look best in the painting. Rocco suggested hanging the snakes tail off the table on the right side and having the snake on the left wrap around the watermelon. Megan agreed and said the mouse should be hiding in the center. I’m still working on this one guys, I just wanted to post it to see if I’m on the right track?

Tuesday, October 14, 2008

oil painting values, tempature and edges


I messed around with the values, temperature and edges a little in an effort to make the fruit pop out some more. There’s still a few things I want to work on before I call it quits. When I go back to class I’ll discuss some other possibilities with the teacher.

Learning Techniques for Oil Painters


There are many ways to learn the tricks of the trade when it comes to oil painting.
For now I'd like to take a moment to talk about a system I use for gather information from today’s top artists from around the world, and I can do it all without leaving my house

Art magazines and art forums supply an endless amount of information on technique, composition, color mixing, mediums, palette, paint properties, proportion, value and much more.

The information is all right there at your fingertips. The problem is that its scattered all over the place from, article to magazine article and forum to forum post. Sure I can read an artists clever oil painting technique one day and in a month or two I'm still staring at the canvas trying to remember what the heck he was talking about.

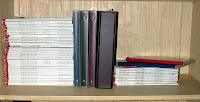
So to conquer this problem I have been taking notes from all of them as if they were my teacher. I have note books and binders filled with very useful information on there methods and techniques.

For instance when ever I come across a useful idea in an artist magazine I immediately highlight it and then copy it to one of my note books. My note books are categorized for easy retrieval of this information when needed.

I have a note book for technique, color properties, color mixing, flesh palette, portrait painting, linear prospective, composition, value and so on. When I come across a new useful category I simply start a new note book and title it for that subject.

While on line I simply highlight the information that I want to retain then copy and past it to a word file labeled for that topic. It's amazing how generous accomplished artists are with this information and their words have been a great inspiration and help to me on my journey to learning how to oil paint.

Saturday, October 4, 2008

Oil Painting Glazing Technique Using Liquin


Here I am a couple of days into the project. I started out by applying a dark wash mix of burnt umber , alizarin crimson, french ultramarine blue and indigo over the whole canvas, then I used a rag to draw the painting by removing the wash.

Then using the liquin I started with cadmium yellow light. Gradually layered the colors to bring the painting together. Our instructor was kind enough to take digital pictures for all of us, which allowed us to continue work at home.

I still have a few more sessions to go before I complete this painting , but I thought it would be interesting to post my progress.

Some notes on the different types of liquin:

Liquin is a durable, non-yellowing medium for thinning oil and alkyd colors, and speeding drying time. Winsor & Newton has extended their popular line of Liquin with three superb, new products.


Original Liquin — Excellent for glazing and producing fine detail, as well as speeding drying time.

Liquin Fine Detail — Reproduces traditional Copal medium for detail work, glazing, and smooth blending without brush marks. Dries to a gloss finish.

Liquin Impasto — Retains crisp textures and brush strokes. Extends tube color and dries to a semi-gloss finish.

Liquin Light Gel — Breaks down immediately when brushed, and creates a non-drip, smooth effect,

Oil Painting Glazing Technique Using Liquin

Art classes started up a few weeks ago at the Arts Guild of Rahway, Our first assignment is a still life using a glazing technique.

I’m using oil paints with liquin as my medium on a toned canvas.

After close observation of the still life arrangement ( watermelon, mango and pumpkin).

We started out with a few quick thumb nail sketches to develop composition.

Tuesday, September 16, 2008

Newark New Jersey Oil Painting


I remember someone saying to paint the things you know.......well do I know traffic.
Wished I didn’t, but I do. In New Jersey it’s just a part of life. I wished It wasn’t, but it is.
So to pass the time when it all comes to a stand still, I’ll shoot some pictures. It keeps me from going crazy ...or maybe it’s a sign that I am? Anyway ......I always said I was going to paint one of these bumper to bumper snap shots one day. So here it is......This is what it looks like on a rainy Tuesday morning, stuck in Newark traffic.... late for work again!

Sunday, September 14, 2008

Sketch work


Ever since I started oil painting, for some reason I stopped drawing. Weather the process of oil painting consumes most of my time or drawing not being one of my strong points, was easy to push aside. Which ever the case, the act of drawing well is important to rendering a good painting. So I’ve decided I better get my act together and start pumping out some more drawings. I have plenty of empty sketch books laying around for years and I really don’t know what the heck I’ve been saving them for. It’s time to start fill them up. I’ll start doing some loose sketches, no rules and regulations I’m just going to have fun with it. If anything interesting comes out I’ll be sure to post it.


This quick sketch is somewhat of a a self portrait, I borrowed the wings from an old owl.

Three Brothers Ascending


I have two brothers and weather they know it or not, they give me strength. They are truly my best friends. I sat in front of the easel with no reference photos, just an idea in my head. Three Brothers Ascending is a reflection of the strong bond brothers have, even after life.


Sunday, August 31, 2008

Oil Paint Tube Storage Drawer

I made some custom dividers at a 45 degree angle, to keep all the paints happy and easy to find.

Ball bearing drawer slides

I hate cheesy drawers, so I used 14" heavy duty "ball bearing" drawer slides.

Saturday, August 30, 2008

Oil painting work station

With the work station almost completed, all that was left to do was build a drawer.
Using 3/4" x 3 1/2" boards I made a 14"x 23 3/4"drawer.
I'm not sure what kind of a joint this is, but I made a mistake and cut something wrong....And this is how I fixed it......!
I'm sure if its an inferior joint, my brother will let me know!!

Artist Work Station Wheels

The hot rims are from Home Depot !

Custom Built Artists Work Station

Sorry but I misplaced my camera battery during the building of this thing ( a common problem as I get older, misplacing things that is)..... so I can’t show you the construction process, but take my word for it.... It was a pain in the ass.
The dimensions are 29 1/2" high x 35 1/2" long x 14" deep. I used all solid 3/4" oak and no laminate. Home Depot didn’t sell solid 3/4" oak in 14"widths so I glued two 7" pieces together using biscuits and avoided using oak laminate for the top and the bottom.
The side sections are a simple frame made with 3 1/2" and 2 ½" planks held together with biscuits. I used rabbet joints to hold the top, bottom and sides together.


Wet Brush Holder

On the left side I made a wet brush holder. To make one of these things. First draw a center line down the length of a 1" piece of wood. Put the wood in a vise and use a wood drill bit to drill several holes on the center line down the length of the wood. ( I used a few different size drill bits to accommodate a few large and small brushes.) Then take your wood with all the holes in it to the table saw a cut it down the center line and there you have it ....two wet brush holders.

Oil Painting Brush washer

I then cut a hole in the top right of the work station to recessed my brush washer, I added support underneath to hold the unit at just the right height. This Idea works well and assures that the brush washer is secure and won’t get knocked over

Artists Work Station


As if the easel I built wasn’t big enough. Believe it or not I still needed more space to work and additional storage space for my art supplies.
I looked at some artist workstations on line and for about five hundred bucks and up, I could have ordered a piece of crap made out of beach wood or oak laminate. You know the kind of cheap furniture with plastic wheels that suck and flimsy drawer slides that break after a few months of use.
Well after putting all that time and work into the easel, I just couldn’t go buy put a piece of junk . So I went back to the drawing board and designed a artists work station that would fit my needs.