Tuesday, December 16, 2008

Art Class


I took some time off of oil painting to help a family member with there home repairs, once again life gets in the way of art. Just thought I’d post this picture of me in art class working. The cool thing about this picture is the Arts Guild of Rahway used it on there web page.

Sunday, October 26, 2008

Snake oil painting

So with a few instructions from my art teacher on bringing the painting to a finish. I felt like I needed to take this painting somewhere else, somewhere personal. So after an in depth discussion on composition with my niece and nephew ages ten and twelve, we decided that this still life would benefit from a little creative licensing. I made the suggestion of adding the snakes looking for a mouse and they told me where they would look best in the painting. Rocco suggested hanging the snakes tail off the table on the right side and having the snake on the left wrap around the watermelon. Megan agreed and said the mouse should be hiding in the center. I’m still working on this one guys, I just wanted to post it to see if I’m on the right track?

Tuesday, October 14, 2008

oil painting values, tempature and edges


I messed around with the values, temperature and edges a little in an effort to make the fruit pop out some more. There’s still a few things I want to work on before I call it quits. When I go back to class I’ll discuss some other possibilities with the teacher.

Learning Techniques for Oil Painters


There are many ways to learn the tricks of the trade when it comes to oil painting.
For now I'd like to take a moment to talk about a system I use for gather information from today’s top artists from around the world, and I can do it all without leaving my house

Art magazines and art forums supply an endless amount of information on technique, composition, color mixing, mediums, palette, paint properties, proportion, value and much more.

The information is all right there at your fingertips. The problem is that its scattered all over the place from, article to magazine article and forum to forum post. Sure I can read an artists clever oil painting technique one day and in a month or two I'm still staring at the canvas trying to remember what the heck he was talking about.

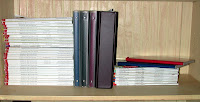
So to conquer this problem I have been taking notes from all of them as if they were my teacher. I have note books and binders filled with very useful information on there methods and techniques.

For instance when ever I come across a useful idea in an artist magazine I immediately highlight it and then copy it to one of my note books. My note books are categorized for easy retrieval of this information when needed.

I have a note book for technique, color properties, color mixing, flesh palette, portrait painting, linear prospective, composition, value and so on. When I come across a new useful category I simply start a new note book and title it for that subject.

While on line I simply highlight the information that I want to retain then copy and past it to a word file labeled for that topic. It's amazing how generous accomplished artists are with this information and their words have been a great inspiration and help to me on my journey to learning how to oil paint.

Saturday, October 4, 2008

Oil Painting Glazing Technique Using Liquin


Here I am a couple of days into the project. I started out by applying a dark wash mix of burnt umber , alizarin crimson, french ultramarine blue and indigo over the whole canvas, then I used a rag to draw the painting by removing the wash.

Then using the liquin I started with cadmium yellow light. Gradually layered the colors to bring the painting together. Our instructor was kind enough to take digital pictures for all of us, which allowed us to continue work at home.

I still have a few more sessions to go before I complete this painting , but I thought it would be interesting to post my progress.

Some notes on the different types of liquin:

Liquin is a durable, non-yellowing medium for thinning oil and alkyd colors, and speeding drying time. Winsor & Newton has extended their popular line of Liquin with three superb, new products.


Original Liquin — Excellent for glazing and producing fine detail, as well as speeding drying time.

Liquin Fine Detail — Reproduces traditional Copal medium for detail work, glazing, and smooth blending without brush marks. Dries to a gloss finish.

Liquin Impasto — Retains crisp textures and brush strokes. Extends tube color and dries to a semi-gloss finish.

Liquin Light Gel — Breaks down immediately when brushed, and creates a non-drip, smooth effect,

Oil Painting Glazing Technique Using Liquin

Art classes started up a few weeks ago at the Arts Guild of Rahway, Our first assignment is a still life using a glazing technique.

I’m using oil paints with liquin as my medium on a toned canvas.

After close observation of the still life arrangement ( watermelon, mango and pumpkin).

We started out with a few quick thumb nail sketches to develop composition.

Tuesday, September 16, 2008

Newark New Jersey Oil Painting


I remember someone saying to paint the things you know.......well do I know traffic.
Wished I didn’t, but I do. In New Jersey it’s just a part of life. I wished It wasn’t, but it is.
So to pass the time when it all comes to a stand still, I’ll shoot some pictures. It keeps me from going crazy ...or maybe it’s a sign that I am? Anyway ......I always said I was going to paint one of these bumper to bumper snap shots one day. So here it is......This is what it looks like on a rainy Tuesday morning, stuck in Newark traffic.... late for work again!

Sunday, September 14, 2008

Sketch work


Ever since I started oil painting, for some reason I stopped drawing. Weather the process of oil painting consumes most of my time or drawing not being one of my strong points, was easy to push aside. Which ever the case, the act of drawing well is important to rendering a good painting. So I’ve decided I better get my act together and start pumping out some more drawings. I have plenty of empty sketch books laying around for years and I really don’t know what the heck I’ve been saving them for. It’s time to start fill them up. I’ll start doing some loose sketches, no rules and regulations I’m just going to have fun with it. If anything interesting comes out I’ll be sure to post it.


This quick sketch is somewhat of a a self portrait, I borrowed the wings from an old owl.

Three Brothers Ascending


I have two brothers and weather they know it or not, they give me strength. They are truly my best friends. I sat in front of the easel with no reference photos, just an idea in my head. Three Brothers Ascending is a reflection of the strong bond brothers have, even after life.


Sunday, August 31, 2008

Oil Paint Tube Storage Drawer

I made some custom dividers at a 45 degree angle, to keep all the paints happy and easy to find.

Ball bearing drawer slides

I hate cheesy drawers, so I used 14" heavy duty "ball bearing" drawer slides.

Saturday, August 30, 2008

Oil painting work station

With the work station almost completed, all that was left to do was build a drawer.
Using 3/4" x 3 1/2" boards I made a 14"x 23 3/4"drawer.
I'm not sure what kind of a joint this is, but I made a mistake and cut something wrong....And this is how I fixed it......!
I'm sure if its an inferior joint, my brother will let me know!!

Artist Work Station Wheels

The hot rims are from Home Depot !

Custom Built Artists Work Station

Sorry but I misplaced my camera battery during the building of this thing ( a common problem as I get older, misplacing things that is)..... so I can’t show you the construction process, but take my word for it.... It was a pain in the ass.
The dimensions are 29 1/2" high x 35 1/2" long x 14" deep. I used all solid 3/4" oak and no laminate. Home Depot didn’t sell solid 3/4" oak in 14"widths so I glued two 7" pieces together using biscuits and avoided using oak laminate for the top and the bottom.
The side sections are a simple frame made with 3 1/2" and 2 ½" planks held together with biscuits. I used rabbet joints to hold the top, bottom and sides together.


Wet Brush Holder

On the left side I made a wet brush holder. To make one of these things. First draw a center line down the length of a 1" piece of wood. Put the wood in a vise and use a wood drill bit to drill several holes on the center line down the length of the wood. ( I used a few different size drill bits to accommodate a few large and small brushes.) Then take your wood with all the holes in it to the table saw a cut it down the center line and there you have it ....two wet brush holders.

Oil Painting Brush washer

I then cut a hole in the top right of the work station to recessed my brush washer, I added support underneath to hold the unit at just the right height. This Idea works well and assures that the brush washer is secure and won’t get knocked over

Artists Work Station


As if the easel I built wasn’t big enough. Believe it or not I still needed more space to work and additional storage space for my art supplies.
I looked at some artist workstations on line and for about five hundred bucks and up, I could have ordered a piece of crap made out of beach wood or oak laminate. You know the kind of cheap furniture with plastic wheels that suck and flimsy drawer slides that break after a few months of use.
Well after putting all that time and work into the easel, I just couldn’t go buy put a piece of junk . So I went back to the drawing board and designed a artists work station that would fit my needs.

Sunday, August 24, 2008

Sad Angel


This painting was inspired by a cemetery angel that caught my eye while visiting family at the North Arlington Cemetery.

There’s something about cemetery angels, they give me the feeling of peace and hope, like someone is watching over our lost love ones.

It seems wherever I go these days I’m looking for something to paint. I must have painted a thousand paintings in my head, the hard part is getting them onto the canvas.

After a resent visit to the Arlington Cemetery in Washing DC. I reflected on the endless sea of white tomb stones for the service men and women who gave there lives for our country and freedom.

I couldn’t help but feel that the angels are suffering also. And that’s what I’m trying to express in this painting.

I don’t usually paint as expressive, contemporary and I guess sloppy as this, but it felt good getting the emotion onto the canvas.


Tuesday, August 19, 2008

Still Life Practice


Here is a still life of some old garden tools I rounded up.

Still Life Practice


Here’s an old bottle I found at a flea market with some flowers from the yard. I used a limited palette while painting loose and quickly.

Painting from Life Practice


After building the easel, I started using my old drawing desk as a still life table. I simply added a back to the table with a piece of plywood and threw a table cloth over it.
After setting up my subject, I turn off the light in the room and use a clamp on light with a 100 watt bulb to add strong shadow drama to the subject. I clamp the light to the back of the easel and move it around till I get just the right shadow I’m looking for.


Sunday, June 15, 2008

Easel Building, Lighting


I needed more light so I got a few 5.5" clamp lights from Home Depot. I used General Electric 100 watt Halogen bulbs. There suppose to enhance the full color spectrum.


Easel building, anti-skid pads


I also installed 1 inch heavy duty rubber anti-skid pads to better secure the canvas when it is locked into the easel.

Easel building, counter weight system

I added a few more things to the easel that will make it more user friendly. With the shelf being so heavy it was necessary to add a counter balancing system to prevent it from dropping to the ground during adjustment. All that was needed for this job were 6 eye hooks, two 1-1/4 utility rope pulleys, two 1/8 quick links, parachute cord, and 20 lbs of weight.


Sunday, June 1, 2008

Easel Building HOMEMADE


Easel Building , Oak

Ok it's just about complete. I sanded the whole easel to a smooth finish and softened all the edges with sandpaper. Then I rubbed the whole thing down with olive oil. I read this on line somewhere and it works great. The oak absorbs the olive oil and when dried leaves an elegant and professional finish.

Saturday, May 31, 2008

Building an Easel

Here is a picture of the brass knobs installed.


Easel Project

I got these solid brass knobs from Lowe’s. All the knobs they had were machined for small screws so I looked for a solid type that could easily be drilled and tapped out to support a larger, stronger screw to hold up that big shelf. So to make these knobs work , I first wrapped the knob in a rag so I didn’t scratch the finish, I then locked it into a vise and simply drilled a larger hole and retreaded the new hole with the proper tap. It worked out really well.

Easel Construction

This is a picture of the back of the shelf, the heavy steel plates on the left and right fit into the cut grove in the side of the easel. This will guide the shelf up and down the easel. While the knobs toward the center will draw in angled steel pieces which will act as a brake locking the shelf into position. Considering the heavy weight of the shelf I can see I’m going to need a counter weight system or a marine crank system to make adjusting the shelf and easy task.


Easel How to Build One

I wanted a large work area so I constructed a 49" x 8" adjustable shelf. I cut a hole in the left side for the paint brush canister and drilled the holes for the locking knobs. It was so big that I needed straps and clamps to hold it to the easel for installation.

Building an Easel

The mast was made with three planks cut at 30 degree angles sandwiched together. The two outer pieces are screwed to the easel while the center plank floats in the center. The mast will adjust high to accommodate a very large canvas, much higher then my eight foot ceilings will allow. I drilled a finger hole in the center of the mast to make adjustments easy and I rubbed the angle cuts with candle wax to allow the mast to glide up and down easily.

Thursday, May 29, 2008

Easel Building

Here's a shot of the lower front hinge. I added the casters for mobility because this thing is starting to get big and heavy.

Easel design

Here you can see how the lower hinges are holding the back to the bottom.

How to build an easel

There are three sets of door hinges that hold the front, back and bottom together. Here you can see how the top hinge holds the back and the front together.

Behind the easel

Here is a picture of the rear structural support of the easel. It is constructed of two opposing u-shaped frames overlapping with a slot cut through on center. I used a table saw for this but a router may work better. The other ends are fixed together with door hinges. A bolt through the center slot secures the two pieces together while allowing the easel to be tilted backward and forward as needed.

Dewalt screw gun

Here are the different size screws I used for the project and just in case your wondering, yes the Dewalt gun is worth every penny! So go get one!

Wednesday, May 28, 2008

Building an Easel

I used wood glue and biscuits to hold the structural components together while using a variety of wood screws to attach the mast , hinges, casters and guides.

Monday, May 26, 2008

Building an Easel

After assembling the base of the easel I picked up some stainless steel utensil containers at Bed Bath & Beyond. I’ll use these for paint brush holders.

Sunday, May 25, 2008

Oak easel project

I glued the front section together using biscuits to hold it all together. The front section of an easel is similar to a ladder, with only three steps spaced far apart.

How to Easel

Home Depot sells pipe clamp ends, so if you need a longer clamp all you have to do is go buy a longer pipe.

EASEL STEP # 1

I started out by cutting the main structural pieces and the base to size then I glued them together with wood clamps. Home Depot doesn’t sell oak in 2x4's so doubling up on 1x 4's or 2x2's is kind of like making your own 2x4.

Easel Building, an idea

Long time no blog!....Sorry ....vacation then jury duty ..... some times life just gets in the way of art.
With so much going on lately the art room was becoming a messy distraction, so I decided to give the room a make over. I got rid of all the clutter, painted the room then while rearranging things I realized my antique desk just wasn’t cutting it for oil painting any more. So I decided to shop around for an easel.
Well..... after looking at hundreds of easels on line I figured how hard could it be to make one of these things? Its just a bunch of wood right ? I’m a handy guy....I could do it.

So off I went to Home Depot to get some wood.

Sunday, April 20, 2008

Painting with the wrong side of my brain ??


Art classes started up a few weeks ago and I thought it would be nice to post the projects as they went along..........Unfortunately..... things haven’t been going so well.
I think I may be painting with the wrong side of my brain or something, I’m gonna have to finish reading that book. Anyway I’m either guilty of trying to hard or not hard enough. You pick it either one will ruin a painting.
The first painting is a little hand made wire Christmas tree. Things started out ok till I tried to render the pink table cloth. All I kept thinking about was the instructor saying "don’t make it look like Pepto Bismal. Well I just couldn’t get around that one, I over worked the heck out of it and now it’s sitting in the trash. The picture you see here was taken just moments before the Pepto Bismal monster killed it.
The floral painting is still a work in progress, The assignment was to paint a small study for a larger painting of 3'x4'.

Saturday, March 22, 2008

Lego Spider-Man and Bionicles oil painting

Here is a painting of my nephew, who just loves all those bionicles and legos his grandmother buys him.
I started this painting last year and stalled out on it. I was having the same problem as the red house painting where I couldn't get the right color balance. So this after noon I thought I’d take another swing at it with the same limited palette of Prussian blue, cadmium red, cadmium yellow med., burnt sienna, ivory black and titanium white. I painted over everything with colors mixed from this palette and things just seemed to blend together better. I still have a ways to go before it's finished, but I thought if I post it now then I may be encouraged to actually finish it.


Friday, March 21, 2008

Limited Palette

While working on this painting I just couldn’t make up my mind where I wanted to go with it. I ended up changing my palette of colors several times because I wasn’t getting the color balance I was looking for. The picture I was working from was taken on a gloomy winter day and that wasn’t helping, so I started experimenting with different color combinations on the canvas. This is really not a good thing to do on such a large canvas because it was both frustrating and wasteful. Next time I’ll do a small color study before I begin a large painting.
The palette of colors I finally decided on were burnt sienna, Prussian blue, cadmium red, cadmium yellow med., ivory black, and titanium white. This limited palette gave me every thing I needed. I really tried to stay loose on this painting using all hogs hair brushes and painting wet on wet. I just love how those Russian impressionists make it look so easy. If I keep working at it real hard I just might get it by the time I’m ninety.